How beer gets from a keg to my belly…
(a long-draw story)
by Paul the media nerd
This is a tale of about a beer molecule’s journey from a keg in your bar to my belly. To ensure the greatest amount of efficiency and comfort (and to increase the beer’s likelihood of being accompanied by many more of her friends) we want to make sure you have a clear understanding of the process, equipment, and parts required to pour a beautifully headed, cold, and refreshing glass of the godlike nectar we call beer.
Gassing Up
Since beer delivery is a pneumatic system hinging on proper pressurization (foam is bad), we start our journey with the gaseous support system of carbon dioxide (CO2) and, on occasion, nitrogen (N2). These two are the long haul drivers in our story. It’s their job to guide and push the beer along the highway to my belly. Without a driver, the beer is going nowhere.
For shorter runs (much like with over-the-road truck drivers) you may only need one driver: CO2. This is usually the case when your run from the furthest keg in your cooler to your beer tower is less than 50 feet with few obstacles. When the run is between 50 to 100 feet, you’ll probably need a co-driver - and for runs beyond 100 feet, that probably becomes a definitely. That’s when N2 comes in to play.
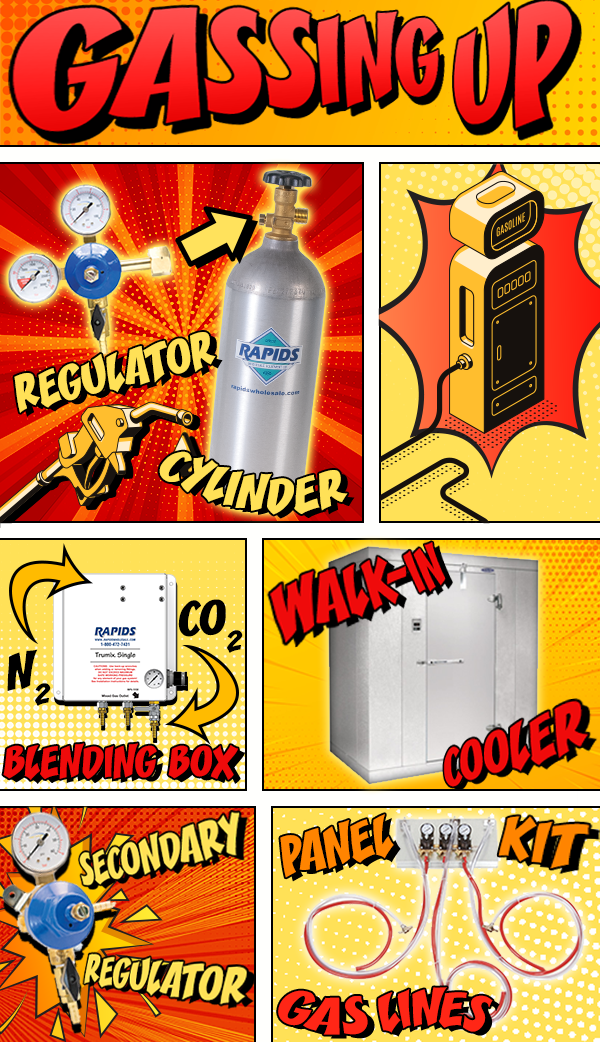
Whatever your gaseous support system ends up being, the gases will start out in a cylinder(s) attached to your primary regulator(s). These regulators will need to push out enough pressure to be able to feed every keg hooked up to your beer towers, meaning they’ll likely be dialed in anywhere from 50-100 PSI (Pounds per Square Inch). If N2 is required, the gases will need to be blended together in a blending box. The ratio of that blend will be determined by the total amount of resistance on your run. The more hills to climb, valleys to navigate, and the longer the road is, the more you’ll need help from the co-driver (more N2).
As the gas begins the journey to your keg, it will need to travel along reinforced or braided gas line to safely accommodate the pressure (50-100 PSI) at which it is being moved. The lines will enter into the walk-in cooler, or keg garage, where they will attach (oftentimes on a panel) to a secondary regulator. This secondary regulator is the off-ramp of the gas superhighway that brings the pressure down to a suitable speed for one lane traffic, normally around 12-13 PSI (this can vary depending on how bumpy the road ahead is). Since the pressure from the secondary regulator is less, the gas line exiting the secondary regulator does not need to be reinforced.
HAZARD WARNING
In a perfect world, there would be an off-ramp (secondary regulator) for each keg hooked up to your tower, but some folks do cut corners by branching off again with gas manifolds. I would caution you, that although this technically can work (and may be okay for small town traffic), cutting corners where there is a lot of traffic will cause congestion. In other words, if you have one keg that sells constantly and fast hooked up to the same off ramp with a slow-moving keg, you will likely end up with issues for both kegs. Remember, rush hour is a really real thing, and it happens in your bar too.
Picking Up My Baby!
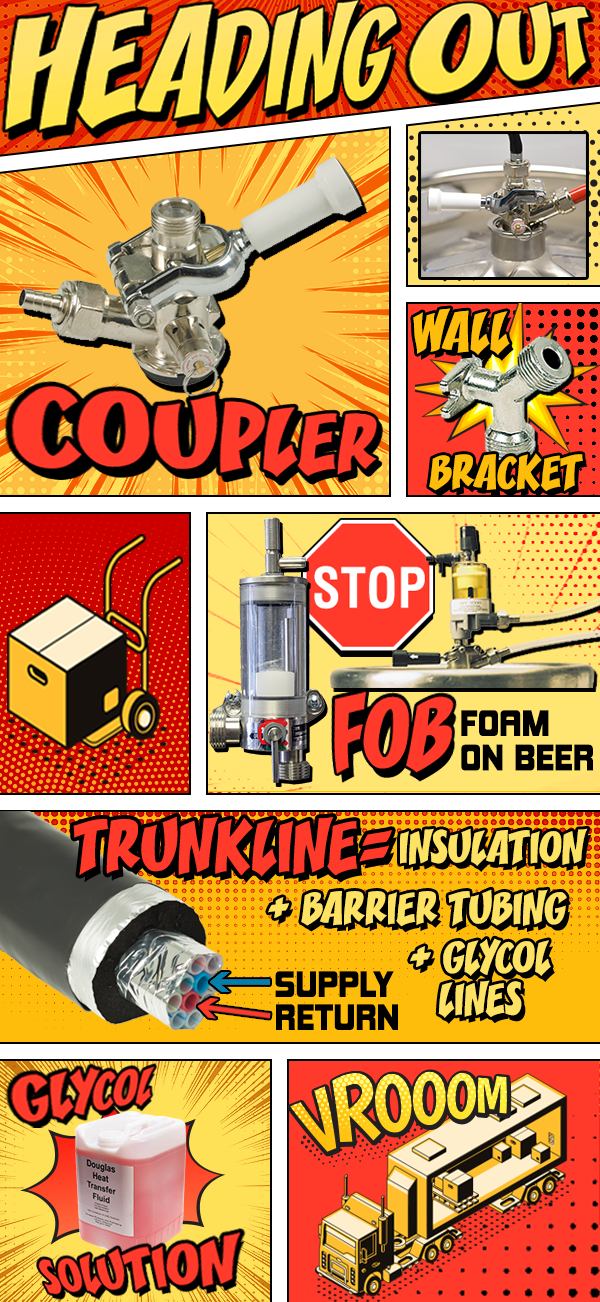
The next step is to introduce the gas to the beer in the keg to get her where she needs to go (my belly!). This exchange is facilitated by the keg coupler. Gas enters the keg through the keg coupler that’s on the top of the keg, filling the headspace above the beer. There’s a tube in the middle of the keg that goes from the top (where the coupler is) to just off the floor of the keg. When CO2 is added to the top headspace, it pushes down on the liquid beer, which forces the beer up that tube and through the coupler when the faucet is opened. It’s the only place left for the beer to go!
CO2 is already present in the beer itself from the fermentation process as carbonation. This new CO2 coming into the keg is primarily there just to add pressure to guide the beer along the rest of its journey when the bartender opens the faucet. BUT, the new CO2 may also want join its kinfolk in the beer solution, so it’s important not to add too much new CO2 when you are trying to reach the pressure needed to carry the beer over the hills and through the valleys to the faucet. Too much CO2 can cause over-carbonation that will throw off the taste, ultimately sending me out the door. You can’t come on too strong!
This is one of the reasons people use a gas blend! You see, N2 has no interest at all in joining in the party in the beer solution. Although it’s not a true inert gas, N2 does suffer heavily from social anxiety and will naturally want to stay away from all the other players by hanging out only in the keg’s headspace. It’s a wallflower, which is perfect because it will fulfill the necessary pressure requirements without becoming part of the beer.
Leaving the Garage
Now that we’re gassed up and have picked up the beer, it’s time to head out on the highway to the bartender’s glass. The beer will travel through a flexible vinyl beer line out of the keg through the coupler. Normally this will be 5 feet of 3/8” internal diameter (ID) tubing connected to the keg coupler with a coupling nut, a sealing beer washer and a tailpiece matching the ID of the beer line. This beer line will ultimately connect to the beer super highway at a wall bracket. The wall bracket is the on-ramp.
STOP LIGHT
It’s highly recommended that somewhere between the keg and the beer super highway you install a stop light. The stop light is the Foam On Beer device, or FOB. FOBs can connect either directly to the keg coupler or on the wall at (or as) the wall bracket. FOBs will automatically stop the flow of beer when the keg goes dry. This is really important for a couple of reasons. First, when a keg blows, it blows violently. When the faucet is opened on a keg that has run out of beer, the last bit of beer in the line will come out with blast of gas behind it, which will spray all over your bar, your bartender, and maybe even nearby patrons. Not cool.
Also, the entire run of beer line is now empty and will need to be refilled and stabilized. The replacement beer from the new keg will end up going straight down the drain because it will undoubtedly pour as foam. Up to a pitcher or more of beer is lost per keg depending on the length of your run. A FOB will prevent the blowout and keep good useable beer packed in the beer line. So when your staff can get around to changing out the keg, it’s like nothing ever happened. It’s magic that will pay for itself in saved product. Install a stop light.
From the wall bracket (or wall mounted FOB) just inside the cooler wall, we will now enter the beer super highway. The lanes of the super highway, called barrier tubing, are designed for super-efficient, turbulence-free travel to prevent foaming. Because of this, they are very stiff. This is why we can’t hook them up directly to the kegs. They simply are not flexible enough. Inside the cooler, insulation is not required around the barrier tubing since it is cold in there. These barrier tubing express lanes will all meet up in one place right before they exit the cooler where they join the maintenance lanes or glycol lines and insulation completing the trunkline just inside the cooler wall.
Trunkline is the combination of your beer express lanes and maintenance (or cooling lanes) all wrapped up together in several layers of insulation. This insulation, along with cold circulating glycol solution in the glycol lines, will help your beer maintain its temperature from the keg in the cooler through its journey to the faucet, preventing foam and gross, warm pours. Glycol solution is normally a 25-50% ratio of propylene glycol to water.
The size of the trunkline is dependent on the number of beer lanes you have and the number of cooling lanes required to maintain their temperature. For up to 8 beer lanes, only 2 glycol lines are required; 1 to go up with the beer to the faucet, and 1 to come back to get cold again (a supply line and a return line). For 10 to 12 beer lanes, we need to double the maintenance lanes/glycol lines to keep it all cold: 2 supply lines and 2 return lines are standard.
Beer Super Highway Maintenance
The glycol solution in the trunkline requires its own refrigeration unit. These units are often referred to as either a Power Pack or Glycol Chiller. They vary in size depending on how much glycol solution you need to keep everything cold, how many beer lines you need to keep cold, and how far you need to pump it along the beer super highway.
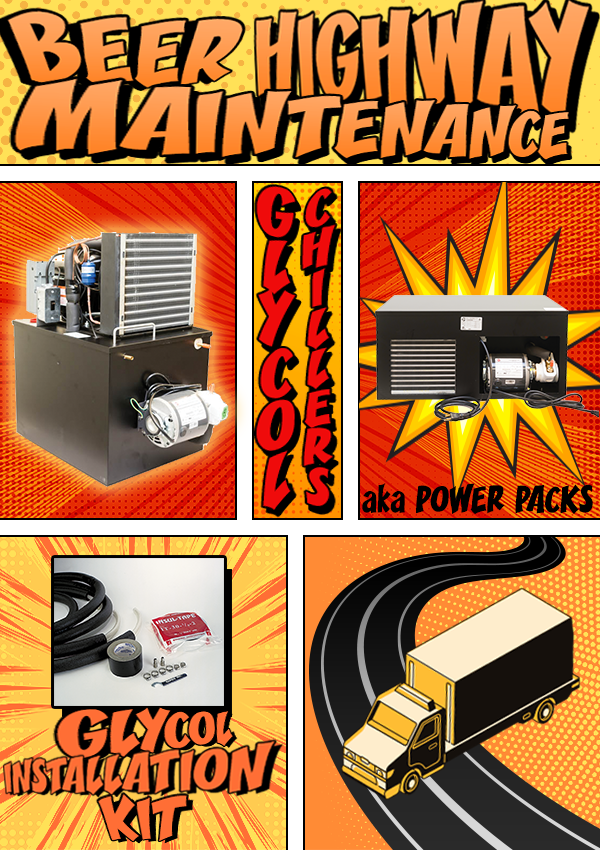
Power packs are the maintenance sheds normally located just outside the keg garage (walk-in cooler). Though they can be placed on the roof of the walk-in, keep in mind that they are super heavy, and it will be hard for you to service them if there isn’t a lot of clearance between the roof of the cooler and the ceiling of your building. You should at the very least check your glycol bath every 6 months to make sure there is enough, that it feels “slippery,” and that there isn’t any crud or particulates in the bath. Chillers can’t be put inside the walk-in because they discharge too much heat.
Since these power packs are outside of the walk-in cooler, we do need to insulate the glycol supply and return lines as they travel from the unit to the inside of the of the walk-in cooler to combine with the beer lines and make the trunkline. This is done with a glycol line installation kit consisting of tube insulation, fittings, clamps, and tape.
ORANGE BARREL ALERT
Consider this. It might not always be in your best interest to put all your beer lines in the same huge trunk line. A failure in a power pack or pump that maintains all your beers would then prevent you from pouring any cold beer at all. Many customers, instead of choosing a single 12 product trunkline, have chosen to use two smaller 6 product trunk lines working off of two smaller chillers (or a larger chiller with multiple pumps), dividing their products so in the event they have a chiller or pump failure on one unit, they can still be pouring cold beer from the other.
Arriving at Our Destination
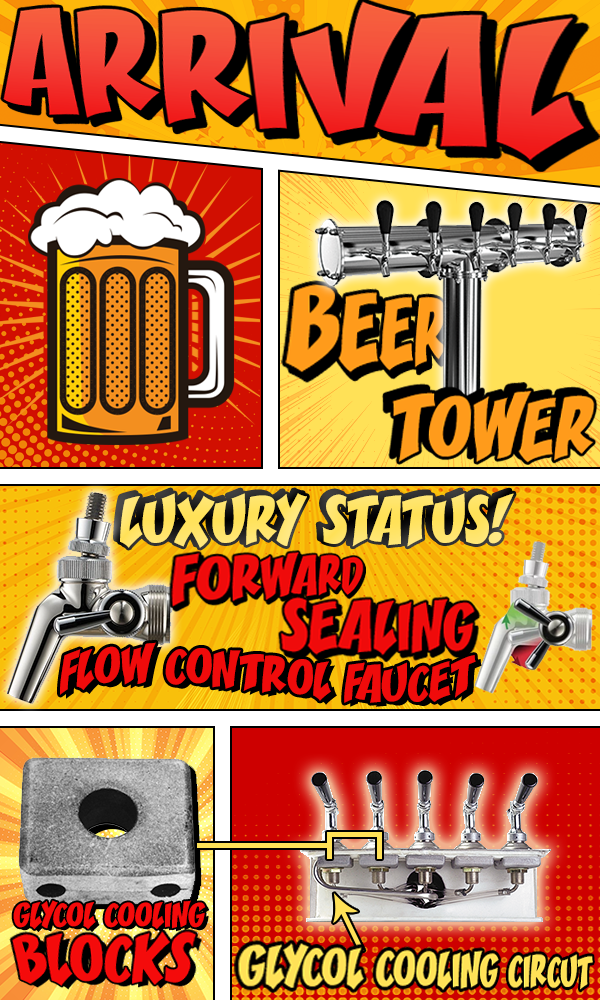
It’s clear navigating the hills and valleys from the walk-in to the faucet will require a little planning. To make sure the pour is at the right pressure, foam-free, and cold as the beer hits the glass, we need to identify how much resistance is in the system. We can dial in the right amount of pressure needed by configuring the diameters of the lines we will use. We call this process line-balancing, and it’s akin to what a civil engineer would do - taking into account the physics of the charted path we hope to traverse and the obstacles we may encounter like run length, rise, fall, serving temperature, and even altitude. Assuming our lines are balanced, we ultimately end up at the beer tower, the last stop before my belly.
At the tower, we will connect the beer lanes or beer barrier tubing to the tower’s beer lines. The tower may have either choker lines (vinyl tubing) or stainless steel bent tube assemblies. If the tower is using choker lines, we need to connect those to our barrier tubing using a hose union with a couple of clamps to secure. If the tower has stainless steel bent tube assemblies, these normally are already barbed, and we can just clamp the barrier tubing directly to them. On the opposite side of either is attached the tower shank and beer faucet. When the system is pressurized and balanced, you simply open the faucet and that wonderful nectar will pour.
Luxury status! You can add a forward sealing flow control faucet to further fine tune the pour right at the glass. Classy!
It’s also important that we keep the beer tower itself and the shanks inside it cold too, so the glycol supply line will attach to a glycol cooling circuit in the tower that will route the glycol solution up along the tower base and through glycol cooling blocks that wrap around the shanks before making a u-turn and coming back out of the tower base and connecting to the glycol return line in the trunkline. The glycol solution will now make its way all the way back to the glycol chiller where any heat it may have picked up along the whole trip will be exhausted. Now fully cold again, the chiller pump will send it back out for another lap.
Once the beer hits the glass, and the bartender hands that glass to me, that’s it! That’s the whole trip. Now you know how a molecule of beer makes it from a keg in your bar to my belly. If you have any further questions, I would encourage you to reach out to our beer experts by giving us a call or popping on our online chat. We’re here to help!
(a long-draw story)
by Paul - the media nerd


This is a tale of about a beer molecule’s journey from a keg in your bar to my belly. To ensure the greatest amount of efficiency and comfort (and to increase the beer’s likelihood of being accompanied by many more of her friends) we want to make sure you have a clear understanding of the process, equipment, and parts required to pour a beautifully headed, cold, and refreshing glass of the godlike nectar we call beer.
Gassing Up
Since beer delivery is a pneumatic system hinging on proper pressurization (foam is bad), we start our journey with the gaseous support system of carbon dioxide (CO2) and, on occasion, nitrogen (N2). These two are the long haul drivers in our story. It’s their job to guide and push the beer along the highway to my belly. Without a driver, the beer is going nowhere.
For shorter runs (much like with over-the-road truck drivers) you may only need one driver: CO2. This is usually the case when your run from the furthest keg in your cooler to your beer tower is less than 50 feet with few obstacles. When the run is between 50 to 100 feet, you’ll probably need a co-driver - and for runs beyond 100 feet, that probably becomes a definitely. That’s when N2 comes in to play.
Whatever your gaseous support system ends up being, the gases will start out in a cylinder(s) attached to your primary regulator(s). These regulators will need to push out enough pressure to be able to feed every keg hooked up to your beer towers, meaning they’ll likely be dialed in anywhere from 50-100 PSI (Pounds per Square Inch). If N2 is required, the gases will need to be blended together in a blending box. The ratio of that blend will be determined by the total amount of resistance on your run. The more hills to climb, valleys to navigate, and the longer the road is, the more you’ll need help from the co-driver (more N2).
As the gas begins the journey to your keg, it will need to travel along reinforced or braided gas line to safely accommodate the pressure (50-100 PSI) at which it is being moved. The lines will enter into the walk-in cooler, or keg garage, where they will attach (oftentimes on a panel) to a secondary regulator. This secondary regulator is the off-ramp of the gas superhighway that brings the pressure down to a suitable speed for one lane traffic, normally around 12-13 PSI (this can vary depending on how bumpy the road ahead is). Since the pressure from the secondary regulator is less, the gas line exiting the secondary regulator does not need to be reinforced.
HAZARD WARNING
In a perfect world, there would be an off-ramp (secondary regulator) for each keg hooked up to your tower, but some folks do cut corners by branching off again with gas manifolds. I would caution you, that although this technically can work (and may be okay for small town traffic), cutting corners where there is a lot of traffic will cause congestion. In other words, if you have one keg that sells constantly and fast hooked up to the same off ramp with a slow-moving keg, you will likely end up with issues for both kegs. Remember, rush hour is a really real thing, and it happens in your bar too.


Picking Up My Baby!
The next step is to introduce the gas to the beer in the keg to get her where she needs to go (my belly!). This exchange is facilitated by the keg coupler. Gas enters the keg through the keg coupler that’s on the top of the keg, filling the headspace above the beer. There’s a tube in the middle of the keg that goes from the top (where the coupler is) to just off the floor of the keg. When CO2 is added to the top headspace, it pushes down on the liquid beer, which forces the beer up that tube and through the coupler when the faucet is opened. It’s the only place left for the beer to go!
CO2 is already present in the beer itself from the fermentation process as carbonation. This new CO2 coming into the keg is primarily there just to add pressure to guide the beer along the rest of its journey when the bartender opens the faucet. BUT, the new CO2 may also want join its kinfolk in the beer solution, so it’s important not to add too much new CO2 when you are trying to reach the pressure needed to carry the beer over the hills and through the valleys to the faucet. Too much CO2 can cause over-carbonation that will throw off the taste, ultimately sending me out the door. You can’t come on too strong!
This is one of the reasons people use a gas blend! You see, N2 has no interest at all in joining in the party in the beer solution. Although it’s not a true inert gas, N2 does suffer heavily from social anxiety and will naturally want to stay away from all the other players by hanging out only in the keg’s headspace. It’s a wallflower, which is perfect because it will fulfill the necessary pressure requirements without becoming part of the beer.
Leaving the Garage
Now that we’re gassed up and have picked up the beer, it’s time to head out on the highway to the bartender’s glass. The beer will travel through a flexible vinyl beer line out of the keg through the coupler. Normally this will be 5 feet of 3/8” internal diameter (ID) tubing connected to the keg coupler with a coupling nut, a sealing beer washer and a tailpiece matching the ID of the beer line. This beer line will ultimately connect to the beer super highway at a wall bracket. The wall bracket is the on-ramp.
STOP LIGHT
It’s highly recommended that somewhere between the keg and the beer super highway you install a stop light. The stop light is the Foam On Beer device, or FOB. FOBs can connect either directly to the keg coupler or on the wall at (or as) the wall bracket. FOBs will automatically stop the flow of beer when the keg goes dry. This is really important for a couple of reasons. First, when a keg blows, it blows violently. When the faucet is opened on a keg that has run out of beer, the last bit of beer in the line will come out with blast of gas behind it, which will spray all over your bar, your bartender, and maybe even nearby patrons. Not cool.
Also, the entire run of beer line is now empty and will need to be refilled and stabilized. The replacement beer from the new keg will end up going straight down the drain because it will undoubtedly pour as foam. Up to a pitcher or more of beer is lost per keg depending on the length of your run. A FOB will prevent the blowout and keep good useable beer packed in the beer line. So when your staff can get around to changing out the keg, it’s like nothing ever happened. It’s magic that will pay for itself in saved product. Install a stop light.
From the wall bracket (or wall mounted FOB) just inside the cooler wall, we will now enter the beer super highway. The lanes of the super highway, called barrier tubing, are designed for super-efficient, turbulence-free travel to prevent foaming. Because of this, they are very stiff. This is why we can’t hook them up directly to the kegs. They simply are not flexible enough. Inside the cooler, insulation is not required around the barrier tubing since it is cold in there. These barrier tubing express lanes will all meet up in one place right before they exit the cooler where they join the maintenance lanes or glycol lines and insulation completing the trunkline just inside the cooler wall.
Trunkline is the combination of your beer express lanes and maintenance (or cooling lanes) all wrapped up together in several layers of insulation. This insulation, along with cold circulating glycol solution in the glycol lines, will help your beer maintain its temperature from the keg in the cooler through its journey to the faucet, preventing foam and gross, warm pours. Glycol solution is normally a 25-50% ratio of propylene glycol to water.
The size of the trunkline is dependent on the number of beer lanes you have and the number of cooling lanes required to maintain their temperature. For up to 8 beer lanes, only 2 glycol lines are required; 1 to go up with the beer to the faucet, and 1 to come back to get cold again (a supply line and a return line). For 10 to 12 beer lanes, we need to double the maintenance lanes/glycol lines to keep it all cold: 2 supply lines and 2 return lines are standard.
Beer Super Highway Maintenance
The glycol solution in the trunkline requires its own refrigeration unit. These units are often referred to as either a Power Pack or Glycol Chiller. They vary in size depending on how much glycol solution you need to keep everything cold, how many beer lines you need to keep cold, and how far you need to pump it along the beer super highway.
Power packs are the maintenance sheds normally located just outside the keg garage (walk-in cooler). Though they can be placed on the roof of the walk-in, keep in mind that they are super heavy, and it will be hard for you to service them if there isn’t a lot of clearance between the roof of the cooler and the ceiling of your building. You should at the very least check your glycol bath every 6 months to make sure there is enough, that it feels “slippery,” and that there isn’t any crud or particulates in the bath. Chillers can’t be put inside the walk-in because they discharge too much heat.
Since these power packs are outside of the walk-in cooler, we do need to insulate the glycol supply and return lines as they travel from the unit to the inside of the of the walk-in cooler to combine with the beer lines and make the trunkline. This is done with a glycol line installation kit consisting of tube insulation, fittings, clamps, and tape.
ORANGE BARREL ALERT
Consider this. It might not always be in your best interest to put all your beer lines in the same huge trunk line. A failure in a power pack or pump that maintains all your beers would then prevent you from pouring any cold beer at all. Many customers, instead of choosing a single 12 product trunkline, have chosen to use two smaller 6 product trunk lines working off of two smaller chillers (or a larger chiller with multiple pumps), dividing their products so in the event they have a chiller or pump failure on one unit, they can still be pouring cold beer from the other.


Arriving at Our Destination
It’s clear navigating the hills and valleys from the walk-in to the faucet will require a little planning. To make sure the pour is at the right pressure, foam-free, and cold as the beer hits the glass, we need to identify how much resistance is in the system. We can dial in the right amount of pressure needed by configuring the diameters of the lines we will use. We call this process line-balancing, and it’s akin to what a civil engineer would do - taking into account the physics of the charted path we hope to traverse and the obstacles we may encounter like run length, rise, fall, serving temperature, and even altitude. Assuming our lines are balanced, we ultimately end up at the beer tower, the last stop before my belly.
At the tower, we will connect the beer lanes or beer barrier tubing to the tower’s beer lines. The tower may have either choker lines (vinyl tubing) or stainless steel bent tube assemblies. If the tower is using choker lines, we need to connect those to our barrier tubing using a hose union with a couple of clamps to secure. If the tower has stainless steel bent tube assemblies, these normally are already barbed, and we can just clamp the barrier tubing directly to them. On the opposite side of either is attached the tower shank and beer faucet. When the system is pressurized and balanced, you simply open the faucet and that wonderful nectar will pour.
Luxury status! You can add a forward sealing flow control faucet to further fine tune the pour right at the glass. Classy!
It’s also important that we keep the beer tower itself and the shanks inside it cold too, so the glycol supply line will attach to a glycol cooling circuit in the tower that will route the glycol solution up along the tower base and through glycol cooling blocks that wrap around the shanks before making a u-turn and coming back out of the tower base and connecting to the glycol return line in the trunkline. The glycol solution will now make its way all the way back to the glycol chiller where any heat it may have picked up along the whole trip will be exhausted. Now fully cold again, the chiller pump will send it back out for another lap.
Once the beer hits the glass, and the bartender hands that glass to me, that’s it! That’s the whole trip. Now you know how a molecule of beer makes it from a keg in your bar to my belly. If you have any further questions, I would encourage you to reach out to our beer experts by giving us a call or popping on our online chat. We’re here to help!

